 A little side trip to the pedigree and history of Rusty...at least as much as we know. The label shows it as a model 10ER (which stands for Experimental Revised). I am not sure what the “10” means. It has a serial number of 84353.
The best we can recollect, my father-in-law bought Rusty from a fellow Scout Master in the early ‘60s while he was living in Pomona, CA. He later moved to Calimesa, CA where Rusty found a new home in the dreaded garage attached to the yellow house (see my blog part 1: Prolog).
I suspect that I am the third proud owner.
The Shopsmith was first developed by a Dr. Hans Goldschmidt in 1946, and began manufacturing by Magna Engineering in 1947. The first units produced were nearly identical to Hans's original experimental model (hence the "E" model) and were sold through Montgomery Ward (honk if you remember Montgomery Ward). There were around 200,000 of these units built during this era.
 |
| The Original Shopsmith |
Over the years, the Shopsmith has experienced a series of refinements and upgrades, beginning with the 10E, then later revised (hence 10ER). Starting in the late fifties, the “Mark” series was introduced where the motor and pulley are hidden within a casing. There have been many iterations in between.
 |
| The Shopsmith Today: Mark 7 |
The database of machines found on the Shopsmith 10ER users group web site places Rusty’s manufacturing date around late 1952 or early 1953. Since it has an original speed changer and a Magna 4” jointer, which the first models did not have, these dates would be a good guess.
...and now, back to our regular programming...
Staying with the Middle
Let’s be honest....the Headstock unit is where all the fun is.
It has rotating parts, shafts that go in and out, not one but TWO locking levers, and even an On/Off switch which gives you complete power over all things Shopsmith. If this was an attraction at Disneyland, the Headstock would be Fantasyland...a bunch of attractions and excitement all squeezed into one small area.
On the other hand...the Baseplate at the end would be like the rockets - kinda fun, but all it does is go up and down. Definitely not worth an E ticket (knock your cane against your walker if you remember E tickets).
The Headrest is like the McDonnell Douglas Rocket in Tomorrowland - interesting to look at, but it doesn’t actually DO anything. (Sigh) I think I need to take a break and find some churros or popcorn.
 |
| Notice the similarity? |
As unexciting as these other parts might be, the Baseplate and Headrest are important to the operation of the Shopsmith and **yawn** need to be cleaned too. Some WD-40 and steel wool, polish and waxing, and these units clean up rather nicely. The cylinder sections which slide on the Way Tubes need extra attention to get them shiny and smooth.
Embracing the Bottom
OK, I must admit...I have seen the light; I have been converted and am now a true believer; I must give up my previous ways and habits; forsake the parts in the middle (for a while anyway), and embrace the bottom. I need to start working on the wood bench, bench ends, and the casters or else I will need sky hooks to hold up the middle parts.
When I first found rusty, the bench ends were mounted on 2x4’s, which in turn were sitting on a set of non-locking casters. This made the machine sit at least four or five inches higher than it should be, and prevented the unit from locking into place.
 |
| The bench before |
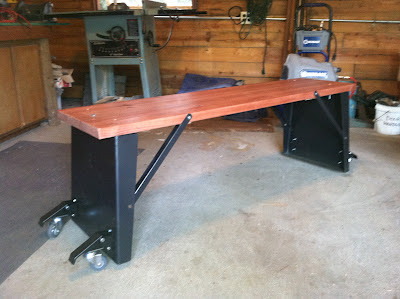
My plan is to drop the whole unit down to its intended height and use retractable casters mounted on the outside of the unit. This would open up the space underneath the bench for a future cabinet to store the various Shopsmith parts and accessories.
I used redwood planks for the solid bench...but in retrospect, I am hoping that these are not too soft of wood and allow excessive vibration of the unit. I then cleaned and sanded the metal bench ends and support brackets, and painted them a Rustoleum Hammered Black. I bought a set of retractable casters from Rockler.com which are perfect for what I wanted.
 |
| The Bench After |
Rusty is now ready for some assembly work to add back the Baseplate, Headrest, and perhaps the Way Tubes and Headstock. Working our way up!

No comments:
Post a Comment