Ahhh...the clean air, the peacefulness, and now retired in Skyforest. Retirement gives us the time for projects, such as restoring a vintage Shopsmith, remodeling our log home, or perhaps just dealing with what mother nature doles out while living at 6,000 feet. Welcome to the Skyforest Life.

Tuesday, April 30, 2013

Shopsmith Restoration 16: Epilog and Author's Note (Updated)


It truly has been an enjoyment in restoring the Shopsmith, and even more so writing about it.  There were many times that I rather forced myself to make some progress with the Shopsmith simply so that I could write the story behind it.  In fact, several blog updates were independent of actual restoration work (witness Episode 14:  Rusty's Letter Back Home, Episode #9:  the Halfway Point & Report Card, and of course the dreaded Episode #13, which we won't mention here for obvious reasons).

It was difficult to know how to write about this project.  Do I write about the Shopsmith restoration to readers far more experienced than I at restoring and using Shopsmiths?  Or perhaps for novices and family members who can barely recall what a Shopsmith is or does (or even care)?  My first few drafts were matter-of-fact journals of the step-by-step process and activity...boring.  Boring to write, and boring to read.  Starting  over, I added some humor to the story, described my own experience and thoughts while bundling through the restoration, and at times using my over-the-top imagination to add some creativity to the story.  For the last part, I apologize.  Particularly Episode #7 where at the end I described Rusty and the Drill Chuck camping and roasting marshmallows.  I mean, after all, it is a well known fact that drill chucks cannot eat marshmallows.  I must add however, that the woodsy background painting was an original painted by my Grandfather.  

I am also quite proud that the blog site was also able to provide a small public service.  The blog spawned several rather lengthy threads on the Yahoo Shopsmith10ER User group about serious issues facing our small user community. For example, Episode #12 generated numerous threads about the best way to clean/restore aluminum tables; and Episode #4 where a search for a particular knurled knob launched a lengthy conversation about the benefits of local community hardware stores versus big box companies.  

No need to thank me.   

I am particularly pleased at the quantity of pageviews the blog received.  With over 2300 pageviews at the time of this writing, it is not a runaway internet viral phenomena, but gratifying nevertheless.  I am inclined to thank the one person who viewed the blog site 2300 times (probably my wife - just to make me feel good).  However, the broad range of countries which viewed the site probably precludes only one reader...and being recently retired and constantly underfoot of my wife, I am pretty sure she has not been traveling to these countries over the last six months.  So, maybe there were at least 12 people viewing the blog.

What I find exciting is the range of countries where we apparently have Shopsmith owners - or at least readers interested in Shopsmiths (or maybe they haven't a clue about Shopsmiths...but just like good writing!).  

Below is a summary of the countries which viewed the blog site and quantity of pageviews:

  • United States (including Alaska) - 1982
  • Canada - 93
  • Germany - 45
  • Australia - 45
  • Russia - 30
  • United Kingdom - 15
  • Israel - 11
  • India - 10
  • South Korea - 7
  • France - 6
  • Argentina
  • Poland
  • Romania

Although there are many sources, most readers found or accessed the blog site through three main sources:  
  • Google searches (looking for anything "Shopsmith")
  • Facebook (thanks to my own family and close friends), and
  • Yahoo Groups (i.e. the Shopmith10ERUsers) user group.

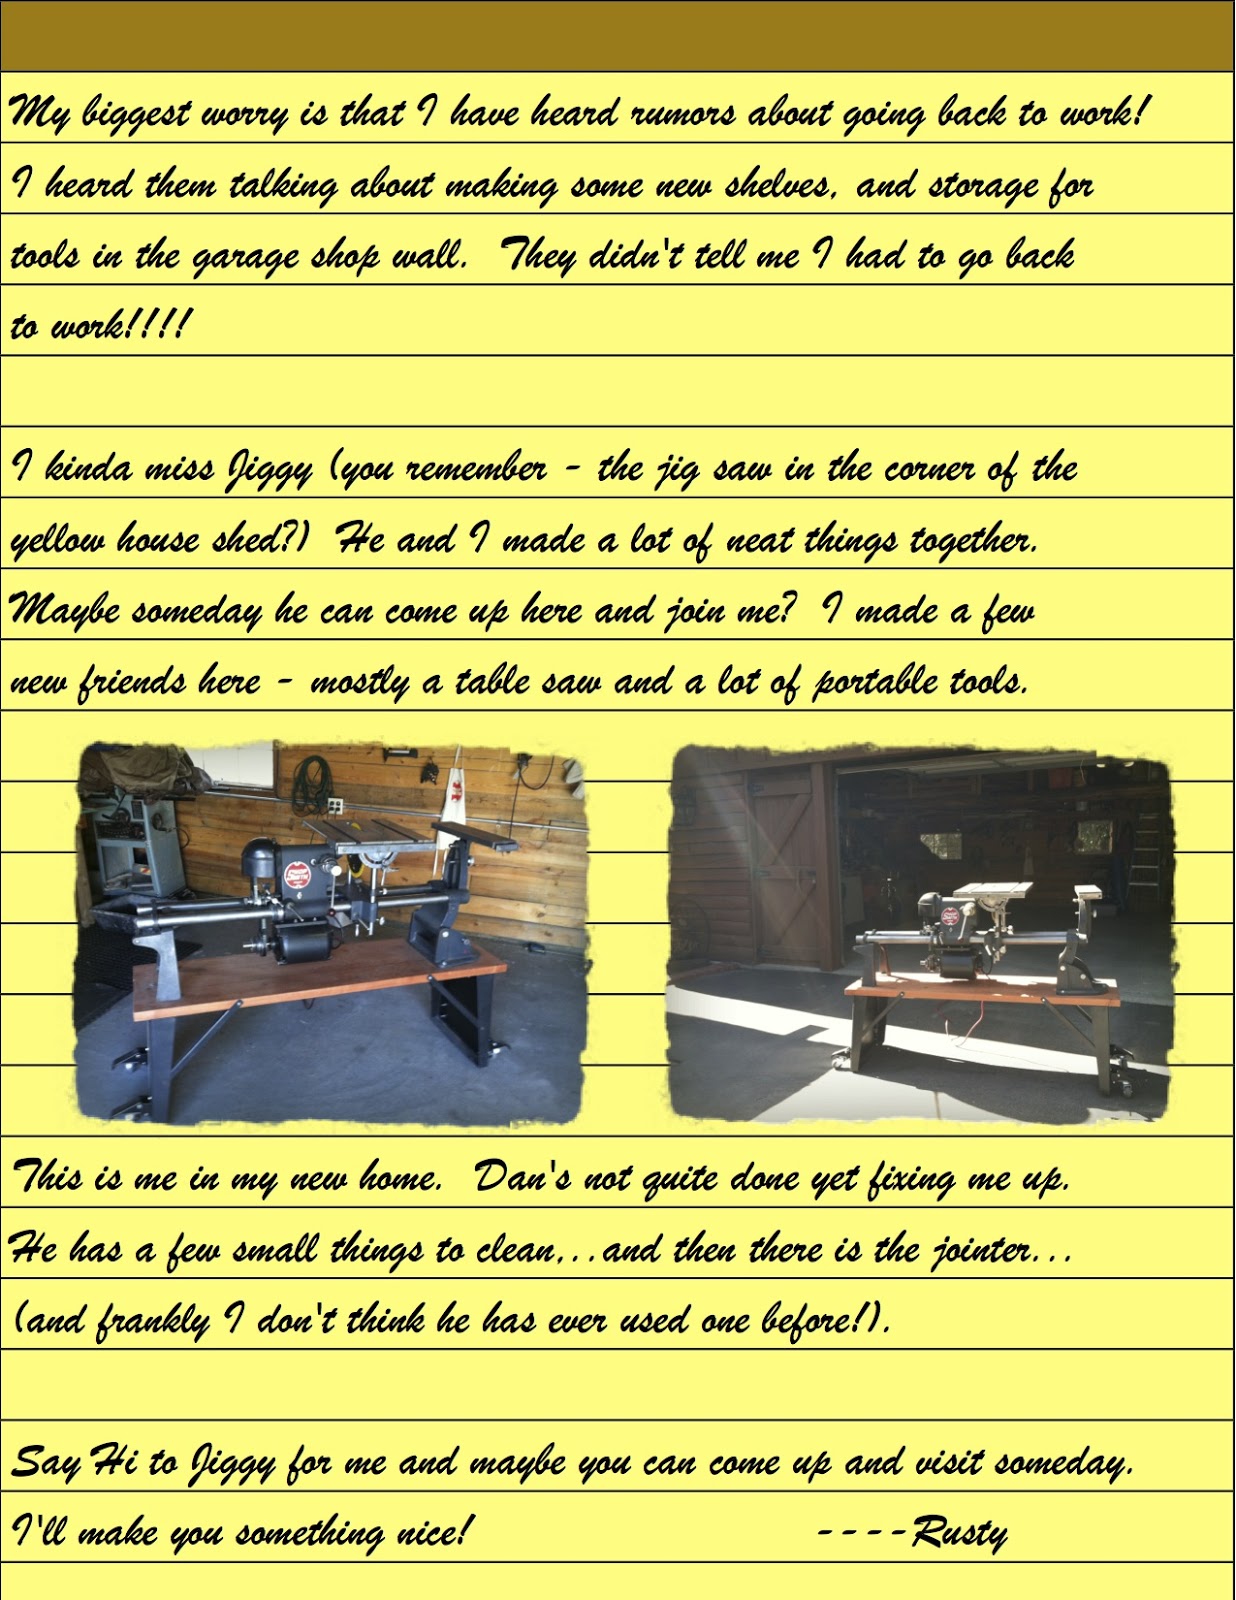
As far as Rusty goes, well I guess I cannot delay the inevitable any more, and must start thinking about using it to build something.  You may recall the very first episode where Diane asked the gut wrenching question:  "So what are you going to make with it once it is back together?" I still have a deer-in-the-headlights stare when the question comes up.   I usually respond with some lame answer, such as "Oh probably some shelves for the garage".

I have a table saw in good condition, so I plan to continue to rely on that for basic table saw operations.  The Shopsmith will be used for a) Dado blades; b) a drill press (I have notice many people have a Shopsmith permanently set up as a drill press), and lastly c) a lathe. If I ever get the Jointer cleaned and in operation, then I can add this to the mix.  However, it does add substantial weight of the machine, so I prefer to keep it stored for know.

Speaking of weight, it will take some time to become familiar and experienced with the operation of the machine.  I found that sliding the headstock or the carriage back and forth is not as simple an operation as it would seem.  These are solid, heavy pieces of machinery, and sometime require two hands to slide.  Besides, you need to a) remember to unlock the carriage before trying to move it, b) remember to lower the Shopsmith to the ground so that it doesn't fly across the garage when you try and push the headstock, and c) remember to completely raise the table (or maybe even remove it) before attempting to slide the carriage as the saw blade wants to completely clear the table to make that operation successful. 

There are many posts and information on user forums about lift-assist mechanisms - ones which help when raising the Shopsmith to the drill press position.  When I first was working on the machine, I had to raise and lower the assembly to align the way tubes.  That wasn't so bad.  Then I added the motor and speed changer assemblies.  It isn't too bad if the headstock and carriage are at the far right of the way tubes...but then to use the drill, you'll need to be on your knees.  Moving the headstock and carriage more to the left of the machine in order to get a workable drill height when rotated up, well, a one-handed lift isn't in my future (as buff as I am).  

I am quite the amateur when it comes to woodworking.  A successful project is one which I walk away with all fingers and all toes (don't ask).  I tend to mark my body with war wounds to prove I have done real work (and also to gain sympathy from my wife and thereby deflecting attention away from the final project reveal).  Any future blog site I may write regarding my woodworking projects will, I am sure, bring both tears of sadness as well as some comic relief.  Nevertheless, don't hold your breath for such a blog site soon.

The Shopsmith is primarily a woodworking machine (although not restricted to that) and hence most of us are woodworkers at various levels of capabilities.  I found it rather ironic then that the restoration of Shopsmiths also requires us to be metal machinist of sorts - cleaning, grinding, scraping, wet sanding, bead blasting, painting. Thank goodness for internet user groups which are tremendously invaluable in helping in the restoration process.  I particularly want to thank Skip Campbell and the Shopsmith10ERusers yahoo group for access to a boatload of technical documents, manuals, and restoration guidance.

I also want to thank my wife, Diane for her support, proofreading, and putting up with all of my craziness. 


Shopsmith Restoration Episode 15: OK...Everybody Line Up!


Well, it all has come down to this: the hardest part of restoration….getting things to line up correctly.  It is one thing to scrape, sand, dismantle, clean, and reconstruct.  But to make sure the table and fences are perpendicular and square with the world, or at least with the headstock, is quite another story (well I suppose this story).

I used three reference sources for this alignment phase:
  • Premier Sawdust Session video Aligning the Mark V Table  (www.shopsmithacademy.com/Sawdust_Sessions.htm).  My Shopsmith is not a Mark V, but the technique was helpful.
  • Sawdust Session #22: Truing the Table to the Drill Chuck.  Here, I am curious of how he leveled the table with shims (the video is too grainy to see exactly what was going on).  In addition, what affect will aligning the table with the drill chuck have on the initial alignment of the table with the saw blade?  Is this an iterative process?
  • An old document by Magna Engineering titled Shopsmith Adjustments.  This resource was the most valuable of the bunch, although it didn't address alignment with the drill chuck.


ALIGNMENT OF THE TABLE WITH THE SAW:  PARALLEL WITH THE MITER SLOTS

I measured the table miter slots against the saw blade using a digital caliper.  The table was off by over .020".  


I loosened the bottom bolts, nudged the table slightly, and remeasured.  


Looks good...but this may change once I test the table against the drill chuck.  


ALIGNMENT OF THE TABLE WITH THE SAW:  PERPENDICULAR WITH THE SAW BLADE


If you look closely at the picture, there is daylight between the angle and the top of the blade (not good).  The way to fix this is through adjustment of the trunnion mounting.  


Now here's where it gets interesting (read: frustrating).  I loosened the trunnion nut which allows the table to rotate freely.  There is a stop lever which  automatically locks the trunnion at standard positions, such as 00, 450, etc.  At 00, the table should be perpendicular to the blade….but it isn't.  

Pressing the stop lever releases it from the trunnion so I can nudge the table into the correct position (by watching the square), then retighten the trunnion nut to lock the table into position.  The next step is to loosen the stop lever (as the photo shows) and tweak it such that it now locks into the table's stop groove, and then retighten the stop lever.  


I tested this by loosening the trunnion, rotate the table around a bit, then back to the automatic 00 position stop.  unfortunately, it moved back to its original off-angle position.  

Phooey.

I tried this process again, and again.  I finally came to the conclusion that there is too much slop in the stop lever to get this table right on the mark.  I'll have to check and adjust this each time I position the table for a saw cut (probably not a bad routine to get into anyway).


Well, that was fun - let's move on to the alignment with the drill chuck.


ALIGNMENT OF THE TABLE WITH THE DRILL CHUCK

The key here is to ensure the table is perpendicular to the drill chuck in two directions: front-to-back (looking at the front of the drill press), and right-to-left.

The front-to-back alignment is the same situation as above - adjusting the trunnion nut and the stop lever - this time at the 900 stop mark.  

The left-to-right alignment (as facing the drill press) is critical because it would require adding shims to the table mounts if the alignment is off. 

Using the alignment process as shown in the Sawdust session, I fabricated an alignment jig using a straight piece of wood with a bolt through one end and inserted into the drill chuck.  Using digital calipers, I measured the distance between the end of the jig and the table while rotating the jig/chuck assembly from one side to the other.  I tried this a couple of times, but kept getting inconsistent readings each time.


Then I had an epiphany: why not use the Carpenter app on my iPhone to measure the slope of the jig compared to the table? (the screen provides a traditional bubble plus a digital readout of the angle).   I found that the jig was not square with the drill chuck, so on one side, it measured +5o but when rotated to the other side shows -70.   What the hey.  So now I have to use some sort of math problem to figure out the correct table position?  I DON'T THINK SO!


Apparently, the jig idea is not going to work for me.  If I had a drill press which could drill a hole straight and true, then maybe the jig would work.  I clearly have a chicken and egg situation here.


Plan B:  The sawdust session says don't use the saw blade, as it may not yield a true measurement when using the drill chuck….so I use the saw blade to test the table alignment anyway.


Using the iPhone app again, the saw blade and the table measured the same angle, within 0.002".  Good enough in my book, and a good sign that the table does not need a shim adjustment (**WHEW**).


I changed the saw blade for the drill chuck with a decently long drill bit, and used a carpenter's square again to double check the alignment.  It looked good. 


I repositioned the Shopsmith back to the table saw position, manually checking the proper 00 position and made some test cuts to check the final alignment.  The photo shows the results of a horizontal cut with one side flipped 1800 after the cut.  I'm satisfied.


The Shopsmith seems ready for doing actual work, and making sawdust.  

The auxiliary table needs to be aligned...but I'll need to do that each time it is removed and re-installed.

There are a few remaining cleanup activities still required, such as the sanding disk, the fence, and finally the jointer - which is going to be a major effort in itself, and good fodder for another blog some time in the future (but not now).


Wednesday, February 27, 2013

Shopsmith Non-Episode 13: Beware Triskaidekaphobia's!


We’re not going to have a Shopsmith Episode #13 because, as you may know, some (particularly those who suffer Triskaidekaphobia) think the number 13 is unlucky.  Because of this, I decided it best to avoid writing a blog update #13.

It is not clear exactly when or why the number 13 became unlucky.  

An old Norse myth describes 12 benevolent gods at a gathering when a 13th god shows up and attacks the group.  I am not sure who won that battle, but you gotta hand it to the 13th god for taking on the other 12 single handedly (well, I assume he had one hand...maybe he had 13).

Another story dates back to Friday the 13th in 1307 when most if not all of the Knights Templars were arrested (although Friday the 13th wasn’t considered unlucky until later in the 19th century).

President Franklin D. Roosevelt refused to host a dinner having 13 guests, and a group in France hire themselves out as the “14th guest” to help dinner hosts avoid that unlucky number.


Many hotels are missing floor #13 (actually the 13th floor exists, they just call it 14).  However, in Europe, the first floor is what we in the US call the second floor, so figure that one out.


Most aircraft do not have a row #13 (but some do) and some airports do not have a gate 13.


Some hotels and hospitals don’t have a room #13, and in parts of Italy, houses may be numbered 12, 12 1/2, 14, 15, ...

The number 13 is not even the first prime number...it’s like the sixth one.  However, it is the smallest emirp (prime spelled backwards) which stands for a prime number which when the digits are reversed is also a prime number - so that's kind of cool.

To numerologists, the number 12 is considered a "complete" number:  12 months in a calendar year, 12 signs of the zodiac, 12 gods of Olympus (I’m partial to god #6), 12 apostles, 12 donuts in a dozen...adding one more to the number 12 just ain’t fittin (although sometimes you get a baker’s dozen of 13 donuts - which is actually a good thing and makes me rather partial to 13). 

So, in summary, it’s best to avoid the number 13 all together, unless you’re ordering donuts.  

I apologize that there is no Episode 13 to read.  You’ll just have to wait for Episode 14.


Monday, February 18, 2013

Shopsmith Episode 12: “Get Off the Table, Mabel!”


Now that we have the main drive train and basic infrastructure of the Shopsmith complete,  we turn our attention to the various accessories.  

First up: the table. 


Background


Traditional table saws have tables which are “fixed”, choosing to raise and tilt the motor/saw blade mechanism with a series of threaded rods and external cranks.  


The Shopsmith folks, on the other hand, had a better idea: keep the motor, pulleys/belt, and saw blade fixed...and move the table.  


This may seem like a much simpler design, and it probably is, but the table support and tilt system is still a rather complex system. The Shopsmith 10ER table mounts onto a tie bar which in turn sits on top of two vertical rods.  The tie bar provides pivot points upon which the table rotates through all degrees, including a full 900 which is required when converting the unit to a vertical drill press configuration.


A trunnion mounted on the tie bar indicates the tilt angle and provides the ability to lock in the angle.  A spring-loaded locking lever automatically locks into the standard 900 and 450 angles.


The height of the table is controlled by a raiser bar attached to one of the vertical rods and a raiser level crank mounted on the carriage.  As the crank is turned clockwise or counter clockwise, the table raises and lowers accordingly.


Rusty’s Table


Enough of Shopsmith 101; let's get back to Rusty’s table. It was, well you guessed it, ...rusty.  


disassembled the table parts - which was the easy part (it’s always the easy part!).  There are more pieces than one (certainly I) would think.  I soaked them in Evapo-Rust overnight and hoped I could remember how to put everything back together.  My goal:  no left over parts after re-assembly.  


I cleaned up the table a little with a simple scrubbing...but I think I can do better.  


And what’s with the insert?  It looks like it was made with a chain saw. This simply won’t do....won’t do at all!


Thanks to MKCTools.com, I ordered a new set of inserts, including one to fit my DADO set. 


I then downloaded a procedure on how to clean and shine up an aluminum surface, which included using oven cleaner, turpentine (not both at the same time), and a sequence of ever-increasing grit sand paper using a wet-sanding technique.


I was able to put the table parts back together again (good thing I took plenty of photos as I was taking them apart!)....and the good news:  no parts left over.   The underside trunnion and brackets cleaned up nicely.


Although there remains several deep scratches, I was satisfied with the result of the table top and assembly.


The next steps:  

The table needs to undergo alignment as the front-to-back angle is off as well probably all the other axis as well.

The remaining accessories (fence, miter gauge, tailstock, end table, etc) all need some attention.


Friday, February 1, 2013

Shopsmith Episode 11: A Shopsmith of a Different Color


 In the previous Episode #10, the motor and belts were installed, and the drive train fired up (all working successfully I might add).  However, in doing so, I was trying to convince myself that the motor should be painted.


I finally agreed with myself (?), and removed the motor for painting.  As long as I am at it, I found the pulley cover to paint it as well.


The motor has air vents and nameplates which need to be covered to prevent paint getting inside the motor.  I disassembled the rotor and end casing from the main motor housing, along with the capacitor cover and power terminal cover.  I covered up the vents as well as the serial plate, and set up a paint booth in the basement (it was 20o outside).


There are many color variations used on Shopsmiths - some from the factory, and others as part of a restoration process:  green ones (seems to be very popular), silver, gray, two-tone, a “goldie”version, a nice black one in honor of the New Orleans Saints (better luck next year), and even a red one.


I was particular enamored with two tone gray/black versions, which is what I adopted for Rusty.


The paint choice was Rustoleum Hammered Black for the motor and Pulley cover - same as used on the support legs.


I mounted the motor back onto the Shopsmith - this time mounting the motor bracket first to the headstock..then mounting the motor to the bracket - much easier than previous escapades.

I realigned the pulleys by using a straight edge to align flush the outer edge of all three pulley assemblies (per the alignment instructions).  


But using this approach, the belts and associated pulley didn’t seem to line up exactly - particularly with the speed changer in the middle.  

So...using the trusty eye-ball approach, I adjusted the three pulley units until the belts were straight and true.  This worked much better, and when I fired up the unit, all pulleys ran smooth and quiet.


Here is the end result:


The next step will be restoration of the table assembly (partially visible in the upper left of the photo).

Thursday, January 10, 2013

Shopsmith Episode 10: “Life. Do You Hear Me? Give My Creation Life!”


For what we are about to see next, we must enter quietly into the realm of genius”.  Dr. Frederick Frankenstein (pronounced Fronkensteen).

Rusty was into the Christmas spirit, with his own stocking (thanks to Diane) and he got a new set of belts!


Time to mount the motor and belts.

The motor is an AO Smith 3/4 hp running at 1725 rpm.  In my previous blog (Episode 5), I rewired the power to the motor, added an on/off switch to the wiring harness, and tested the motor.   Unfortunately, my clever pre-wired harness idea from Episode 5 didn’t work. It turns out that I didn’t provide enough length of wire to the switch, and with the motor sitting apart from the headstock, the wire was too short.  If I installed the motor onto the mounting bracket, the wire would be sufficiently long enough but there was no room for my hand to reach up into the headstock to mount the switch. 

Phooey.

Remove the motor, remove and disassemble the wiring harness.  This time, put the wire on the switch with plenty of excess wire on the other end, and mount the switch inside the headstock before mounting or connecting to the motor.  I’ll make the connection inside the motor after installation.

I cleaned up the motor the best I could...but frankly it’s not looking that great, and am beginning to think about painting the motor. 

Nevertheless, I installed the mounting bracket onto the motor first, then attempted to mount the motor/bracket assembly onto the headstock and its two bracket rods. This was not a slam dunk (and we all know how easy a slam dunk is).  I read somewhere that rotating the shopsmith unit vertically made it easier to mount the motor. I tried that. The motor/bracket assembly must weigh 500 lbs (well...almost) so holding it with one hand while aligning it onto the bracket rods with the other was...well...futile (and I was particularly buffed up that day!).

Take two.


Putting the shopsmith back into the horizontal position, I tried various mounting techniques until I was able to mount the motor successfully.  I placed the motor about an inch off the bench using a piece of wood, then raising and lowering the shopsmith and adjusting the bracket rods several times (and praying to the alignment gods), I was finally able to slide the rods into the bracket and attach the motor.


Next: Reconnect the Power Wiring

The access hole for the motor wiring terminals has two indents on each end  - I suppose to be used as a type of strain relief for the power cables.   I ran the wires through the upward strain reliefs (it seemed more convenient) but the cover left small openings which might allow sawdust to build up inside the motor.  The access hole cover has a right angle lip on one end, and flat on the other. I reversed the process and ran the power wires through the lower strain reliefs and placed the lip side of the cover on the upward side of the access hole.


I tested the motor and switch again - the wiring works and the motor still runs - thank the gods.


Next are the pulleys and belts.  

Many thanks to Skip Campbell (MKCTOOLS.COM) on Shopsmith10ERUsers.com for providing a substantial amount of information on the speed changer and belt installations and alignment.

The three-step cone pulley assembly which mounts onto the motor shaft is strange as it includes the pulley as well as some sort of shaft adapter.  The pulley unit which mounted onto the headstock shaft didn’t require such an adapter.  It must be that the two pulleys are standard size, and that the AO Smith motor comes with a smaller shaft size hence requiring an adapter. (Duh).


To install the belts, the speed changer pulley assembly must be removed (the belts will not fit between the pulley and the Way Tubes).  


Sliding the speed changer off and on (twice if you get the belts in the wrong order the first time) took some effort.  I’m holding the way tubes up with one hand (as buff as I am), while sliding off the end Tie Bar and then the Speed Changer, slip the belts over the pulleys (making sure to get the them in the wrong order the first time), slide the speed changer back into position, and slide the Tie bar back on. **Whew** 


As a degreed engineer, I was trained to read the instructions only as a last resort.  The Shopsmith Speed Changer instruction manual suggested to not slide off the entire assembly, but remove the pulleys themselves from the speed changer spindle.  This was much easier.  


Now following the instructions, I mounted the belts onto the speed changer, headstock and motor pulleys. The final adjustment is made at the motor mounts by raising or lowering the motor to obtain the correct tension.  This I did, but am not too happy with the result as the motor is not level and tends to ride up closer to the pulley. But, I am eager to fire up the total drive assembly so I will not worry about that just now.  I have decided to remove and paint the motor, so it will be coming apart again anyway.

...and now the true test...

Inviting Diane out to the garage for the big test (needing a witness despite the subfreezing temperatures), I plugged the unit in and flicked the switch...


It’s Alive!!  The unit works!!  All shafts turn, speeds adjust, no parts flying off, and no smoke.  

However, there is a slight rattle coming I think from the speed changer.  After painting and re-mounting the motor, I will need to make sure all belt tensions and alignments are done properly to see if the rattle goes away. 


Next step:  Disassemble and paint motor, find and paint the pulley cover, reinstall and align everything.