Ahhh...the clean air, the peacefulness, and now retired in Skyforest. Retirement gives us the time for projects, such as restoring a vintage Shopsmith, remodeling our log home, or perhaps just dealing with what mother nature doles out while living at 6,000 feet. Welcome to the Skyforest Life.

Monday, September 24, 2012

Shopsmith Episode 6: Embracing the Bottom and other Misc Ramblings


A little side trip to the pedigree and history of Rusty...at least as much as we know.  The label shows it as a model 10ER (which stands for Experimental Revised).  I am not sure what the “10” means.  It has a serial number of 84353.

The best we can recollect, my father-in-law bought Rusty from a fellow Scout Master in the early ‘60s while he was living in Pomona, CA. He later moved to Calimesa, CA where Rusty found a new home in the dreaded garage attached to the yellow house (see my blog part 1: Prolog).

 I suspect that I am the third proud owner.

The Shopsmith was first developed by a Dr. Hans Goldschmidt in 1946, and began manufacturing by Magna Engineering in 1947.  The first units produced were nearly identical to Hans's original experimental model (hence the "E" model) and were sold through Montgomery Ward (honk if you remember Montgomery Ward).  There were around 200,000 of these units built during this era.  

The Original Shopsmith

Over the years, the Shopsmith has experienced a series of refinements and upgrades, beginning with the 10E, then later revised (hence 10ER).  Starting in the late fifties, the “Mark” series was introduced where the motor and pulley are hidden within a casing.  There have been many iterations in between.  

The Shopsmith Today:  Mark 7

The database of machines found on the Shopsmith 10ER users group web site places Rusty’s manufacturing date around late 1952 or early 1953.  Since it has an original speed changer and a Magna 4” jointer, which the first models did not have, these dates would be a good guess.


...and now, back to our regular programming...


Staying with the Middle

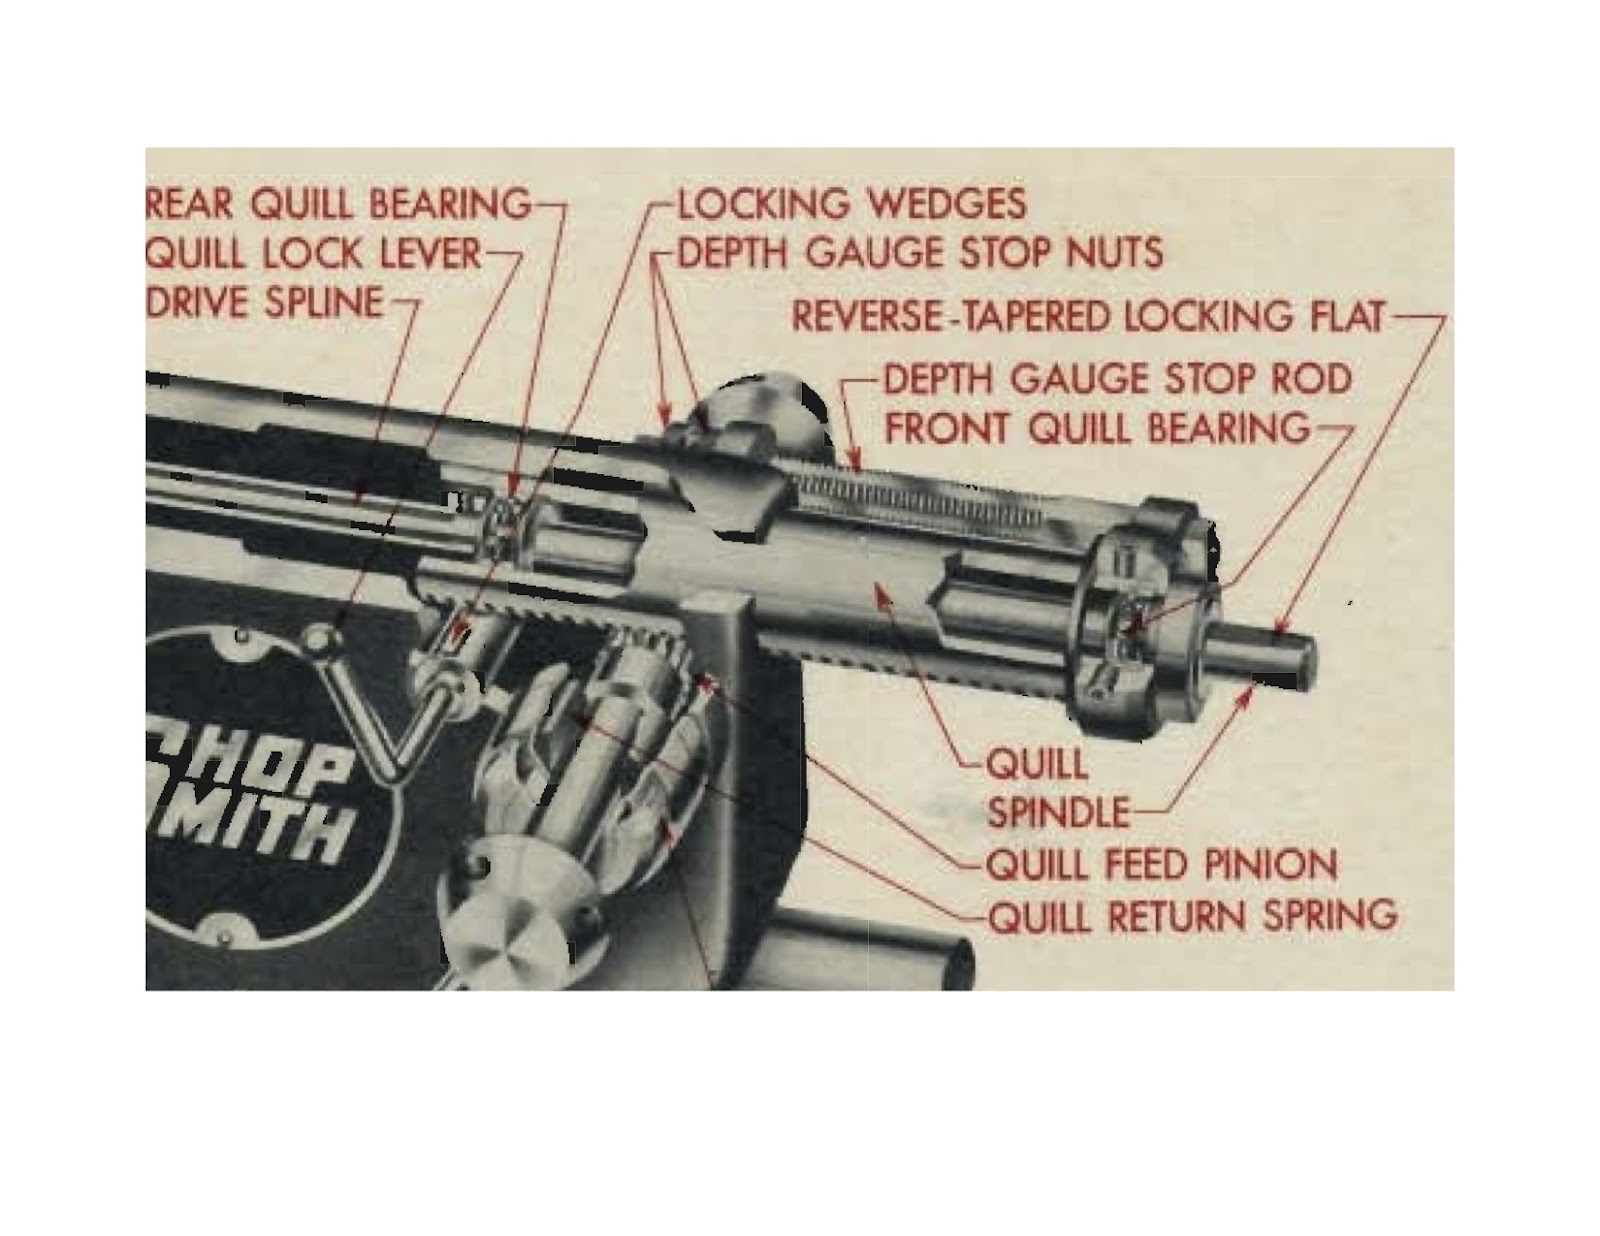
Let’s be honest....the Headstock unit is where all the fun is.  
It has rotating parts, shafts that go in and out, not one but TWO locking levers, and even an On/Off switch which gives you complete power over all things Shopsmith. If this was an attraction at Disneyland, the Headstock would be Fantasyland...a bunch of attractions and excitement all squeezed into one small area.  

On the other hand...the Baseplate at the end would be like the rockets - kinda fun, but all it does is go up and down.  Definitely not worth an E ticket (knock your cane against your walker if you remember E tickets).  


The Headrest is like the McDonnell Douglas Rocket in Tomorrowland - interesting to look at, but it doesn’t actually DO anything.  (Sigh) I think I need to take a break and find some churros or popcorn.

Notice the similarity?

As unexciting as these other parts might be, the Baseplate and Headrest are important to the operation of the Shopsmith and **yawn** need to be cleaned too.  Some WD-40 and steel wool, polish and waxing, and these units clean up rather nicely.   The cylinder sections which slide on the Way Tubes need extra attention to get them shiny and smooth.


Embracing the Bottom

OK, I must admit...I have seen the light; I have been converted and am now a true believer; I must give up my previous ways and habits; forsake the parts in the middle (for a while anyway), and embrace the bottom.  I need to start working on the wood bench, bench ends, and the casters or else I will need sky hooks to hold up the middle parts.

When I first found rusty, the bench ends were mounted on 2x4’s, which in turn were sitting on a set of non-locking casters.  This made the machine sit at least four or five inches higher than it should be, and prevented the unit from locking into place. 

The bench before


My plan is to drop the whole unit down to its intended height and use retractable casters mounted on the outside of the unit.  This would open up the space underneath the bench for a future cabinet to store the various Shopsmith parts and accessories. 

I used redwood planks for the solid bench...but in retrospect, I am hoping that these are not too soft of wood and allow excessive vibration of the unit.  I then cleaned and sanded the metal bench ends and support brackets, and painted them a Rustoleum Hammered Black. I bought a set of retractable casters from Rockler.com which are perfect for what I wanted.


The Bench After

Rusty is now ready for some assembly work to add back the Baseplate, Headrest, and perhaps the Way Tubes and Headstock.  Working our way up!

Tuesday, September 18, 2012

Shopsmith Episode 5: Electrification of the Motor!


  • Fire Extinguisher:  Check
  • Haz Mat Suit:  Check
  • DEFCON Level raised to DEFCON 3:  Check
  • Warn So Cal Edison of a pending power surge:  Check


We are now ready to test the motor, which has not seen electricity in nearly two decades.  The motor needs a great deal of cleanup, and will probably need some paint.  Nevertheless, I wanted to test the motor to make sure it runs, and is worth all the trouble of cleaning and painting

The power cord was in very bad shape - between various splices that have been made, rodents using it for hors d’oeuvres, and time itself, the cord has become a dangerous weapon.  When I opened the cover to the motor terminals, I was surprised to find the power cord terminated on the inside of the motor terminal...meaning I had to disassemble the motor case to gain access to the power terminals.


Disassembling the motor case wasn’t too difficult as there were only four long screws holding the casing together, despite one which was stubborn and had to be cut off.


The power cord wires were soldered to the outer two lug screws on the terminal block.  I decided that there was a better way, so I cut off the power cord wires in the back, then added two new terminal nuts to the front of the terminal block, and wired a new power cord to these terminal points using spades. 


I added a ground lug (green wire) to the motor casing, which originally they did not believe in grounding such things.  

The black spliced and taped wires allow the new on/off switch to be in the circuit.  The original switch is long gone, as it apparently burned out, and was simply by-passed.   

So we are ready for the test.  To find out the outcome (drum roll please), I have provided the original video of the first test.  See for yourself:


In the event the video doesn't show or play properly, click on the following to re-route you to YouTube:   AO Smith Motor Test

Well, as you can tell, I lived to see another day, So Cal Edison didn’t have a clue what just happened, and the world has been safely reduced to DEFCON 5.  Now, if I can just figure out how to get out of this Haz Mat suit....


Friday, September 14, 2012

Shopsmith Episode #4: By the time I got to Headstock...


I decided since I was starting in the middle, I should also have a look at anything that may be broken and require ordering replacements parts. There are two things which trouble my mind: Can Dallas go all the way this year, and Mitt Romney...seriously?  But I digress.  

Pertaining to the Shopsmith, two items needing attention are:

a.  The Motor.  This is a big question mark as it has not seen any electricity in over 20 years.   Although the motor shaft spins manually, the unit is full of sawdust and other unmentionables, and the power cord is toast and must be replaced before any electricity is applied.


b.  The Headstock Quill Assembly.  The quill is a kind of rack and pinion set-up that allows you to move a drill bit or what have you in and out along with a spring to retract it automatically (see close-up diagram).  Rusty’s quill spindle does not extend with ease nor does the automatic spring retract work.  Is it simply full of gunk?  Is the spring broke or come dislodged?  


I have seen YouTube videos and forum threads about the woes of fixing or replacing the quill spring.  
I disassembled most of the headstock assembly and tested the spring assembly part - but only gently in fear that it would uncoil, shoot across the garage, break my framed autograph picture of Bartles and James, and cause me to spend a month of Sundays putting it back together again (the spring - not the autographed picture, that is irreplaceable).  


The spring unit seemed to be working, and mostly full of gunk.  I soaked everything in the Evapo-Rust bath overnight and used some cleaning solutions, wire brushes,  
steel wool, and some polishing compound.  The quill now moves in and out much better, and the quill spring retracts the unit nicely.


Cleaning the headstock, or any of the painted cast iron assemblies, is a challenge.  I do not intend to repaint these items -  they have a nice bluish-grey color and are not in that bad of shape.  How to clean off the rust and grime without grinding off the paint?  

I reached into my arsenal of caustic chemicals for help.  I tried a spray bottle of Purple Cleaner (which isn’t really purple) along with various scotch brite and steel wool.  It provided some cleaning, but left a white residue, and seem to have no effect on rust.  Another bottle called Black Magic made things shinier, but I saw no signs of prestidigitation.  The naval jelly was too harsh on the paint, as were the wire brush and scotch brite grinder attachments.  By accident, I used some steel wool over some WD-40 and it surprisingly did an admirable cleanup job.  Truly a miracle product.  

I must say that there doesn’t seem to be a good way of  cleaning out the small openings used by the locking levers and set screws, and in particular, the hollow inside of the pulley shaft used by the quill.  The Dremel tool with a wire brush helped a little, otherwise it was a comical exercise in trying to get some amount of caustic fluid and steel wool inside these orifices.  I still can’t figure out how to clean out the tapped hole used by the set screws.

I waxed up the orifices (the best I could) and quill assembly and reinstalled everything.  Although I chose not to paint the main unit, I think it turned out fine.  


I also chose not to replace the bearings at this time...although this may become a future project.

Two down -122 to go.  Next step: the motor


Sunday, September 9, 2012

Shopsmith Episode 3: Rusty’s Restoration...Where to Begin?


Now that we have Rusty at his new home...where to begin the restoration process?  Is there a logical sequence to this?  Do you start at the top and work down...or at the bottom and work up?  Are there some parts that need attention first before working on others?

Well, actually, the first thing to do is to search the internet for any help I could find.  Several sites are quite helpful: the Shopsmith10ER users group (of which I am now a formal member), Shopsmith.com - (the company's web site), Shopsmith.net/Forum, MKCtools.com, and a variety of Youtube Videos (one particular one in Polish instructing a four year old on how to clean the Shopsmith was very informative...I took notes).

The next thing to do is to go shopping at a hardware/auto parts store and buy anything you can find which is caustic, has little pictures of a skull and crossbones and/or nuclear symbols, are products having miracle claims to remove rust and grime with no elbow grease involved, and every grinder attachment you can find which looks medieval.

But, through all of this, it still didn’t answer the question: Where to begin?  So, I decided what the heck...let’s start in the middle and begin cleaning the Way Tubes (the Tubular Ways for those not hip to the insider terminology).

(Note to Self:  Lessons Learned - DON'T start in the middle.  Start at the bottom and work up so that parts being refurbished can be mounted as you go and not stored in the corner of the garage waiting for other things to be completed.)

 The Way Tubes


The Way Tubes are about five feet long, 3 inches in diameter, very black, and very rusty (so to speak).  What’s the best way to clean them?  


One person built a tub large enough to handle the tubes and used the electrolysis process - a combination of washing soda and leads from a battery or battery charger sticking in the watery substance.  Heck, why don’t I just climb in myself holding a toaster and be done with it?    

Another creative person filled a long PVC pipe with water, capped one end, stuck the Way Tube inside, poured in a bunch of potatoes (I think he was a vegetarian), and let it soak for two weeks.  Somebody else tried this approach with no success, and complained about the terrible stink afterwards (he obviously didn’t use the correct spices with the potatoes).

What I finally selected was the PVC pipe idea, but lay it horizontally, cut an opening across the top length wise, and fill it with a couple of bottles of the miracle solution Evapo-Rust - a biodegradable, ecological friendly product. 


Let it soak overnight, and it comes out looking like this (below)... (the tube in the background is the other original tube).


But wait...there’s more!  It’s still not as shiny as the pictures of the other guy’s tubes..and not very smooth.  

I stole somebody else's idea of creating a makeshift lathe so that he could sand and polish the tube while it was rotating.  I lashed together a cheap lathe jig device using a drill as the driving motor.


Using a sanding block and several types of steel wool, and then finally some paste wax, the tubes turned out rather decent.


Ok - so...Way Tubes: Check.  One down and 123 more things to restore.


Shopsmith Episode 2: Shopsmith 101


Shopsmith 101


Before we continue any further in this epic journey, let us pause for a bit of reflection on the beauty and elegance of this great machine.  The following brief tutorial will initiate the uninitiated, will make believers of the non-believers, and will give me something to do while the tubular ways are soaking in an evapo-rust bath. Pay attention as there will be a pop quiz at the end.

Below is a diagram of a vintage Shopsmith unit.  


The main components are:


  • The Headstock.   This is the primary unit as it includes a motor which spins the pulley, and turns a shaft inside the headstock.  This shaft can be connected to a variety of tools converting the machine into a table saw, drill press, cheese slicer, what have you.


  • The Carriage.  The carriage allows various amenities to be mounted on the unit, such as a table for the saw.

  • Tubular Ways...or Way Tubes.  The headstock and the carriage slide back and forth on the “Tubular Ways”.  For those really in the know, they are referred to as "Way Tubes", which I suppose is short for Wayular Tubes.  But that would be too hard to say, besides its stupid.  So Way Tubes it is.

  • The Baseplate, Headrest, and Tie bar support and align the Way Tubes.


 The Shopsmith is the swiss army knife of power tools, and can be configured in countless ways for hours of fun.  The diagram below shows the unit as a lathe for turning stuff, a sander, a table saw, and a horizontal drill press.


For those whose religious beliefs considers working perpendicular to the earth’s gravitational pull as the work of the devil, the Shopsmith can be rotated vertical for up and down activity in complete harmony and in parallel with the gravitational pull.


POP QUIZ:  From the list below, name the five uses of the ShopSmith


Drill Press
Horizontal Boring
Disc Sander
Table Saw
Lathe
Routing
Jointer
Drum Sanding
Compound Angle Cutting
Jig Saw
Coving Cuts
Edge Shaping
Rock Cutting/Polishing
Printing Press
Tool Sharpening
Adjustable Drafting Table
Paint Sprayer
Engraving
Dado Cuts
Miter Cuts
Vertical Sawing of large pieces
Glue Press
Paint Mixing
Egg Mixer/Beater
Drilling the little holes inside Olives
Sanding off the burnt toast
Margarita Mixer


ANSWER:  It is a trick question as the Shopsmith is capable of doing all of the above, plus many more.

Wednesday, September 5, 2012

Shopsmith Episode #1: Prolog - The Resurrection of Rusty


Teaser


Join us on this epic journey as our hero launches into the unknown, facing certain dangers and placing himself at  personal sacrifice in the rescue of an ancient artifact left abandoned and neglected for decades.  The story takes us from a small, quiet retirement community in the high desert of Southern California to the top of a mountain peak. Blood will be spilled, money will change hands, time will be waisted, mistakes will be made, and four-letter vocabularies will be stretched to the limit as our hero abandons family relationships and shirks personal responsibilities all in the search for inner beauty and the attempt to repair and render functional what is currently completely dysfunctional.

Is it too late for this salvage operation to be successful?  Is our hero truly crazy as his wife, and closest companion of 42+ years claims?  Are parts of this relationship (the machine, not the wife) so broken that even time cannot mend?  Will he ever find out what the heck a 4" jointer is and what to do with it?    Hear our hero say (in an election year): "I intend to clean up this whole operation".  See for yourself the deer-in-the-headlights look as he attempts to find a response to the probing question Diane asks "So...what are you going to make with it once it's back together?" 

But take heed, my friends, and be forewarned:  The following story is a true but a very dirty one...venturing into the unknown, with new mysteries at every turn.  Corrosive materials and dangerous devices, which could be once considered medieval torture devices, are used to uncover the truth beneath the grime and filth.  

You continue at your own peril....


The Discovery


It was a hot mid-August afternoon in the high desert community of Calimesa, CA.   Diane, my wife and closest friend for over 42 years, was giving her mother a much-needed haircut. Having no football to watch, I grabbed a weak flashlight, and with no protective clothing nor firearm, I decided to explore the much dreaded garage connected to the ‘Yellow House’.  Located at the front of the five acres, this small, one-bedroom building was once a habitat for humans, but abandoned long ago.  It is now used solely for storing seasonal artifacts (i.e. tons of Christmas stuff) and other archeological finds.   The shed attached to the house was once the workshop and storage facility used by my father-in-law before he passed away in 1993.  

Using a key to unlock the entrance to the shed, the door creaked open to reveal a dark room with floor-to-ceiling cobwebs, spiders, rats, and surely one or two ghosts.  Wood debris once stored in the rafters now lay strewn on the shed floor in an apparent attempt of a remodeling exercise by the rodents.  I ventured through the cobwebs (all while humming the theme song to Indiana Jones) towards the back of the shed where the treasure was hidden beneath dust, debris, rags, and *a-hem* layers of rodent poop.

I attempted to move the unit on its casters and found it to be quite heavy and difficult to roll.  I realized that this was going to be a bigger effort than originally expected.  Reinforcements and some heavy duty equipment were going to be required if this salvage operation was going to be successful.


The Extraction


It was August 24, 2012.  Another hot and humid day in Calimesa.  My wife and I arrived in the morning armed with a trailer, a 9000 lb capacity winch lashed to the high heavens to the back of the trailer, ramps, tools, gloves, hats, masks, log sleeve shirts, and a 1500 watt portable lamp ( I wanted to scare the snot out of anything still living inside the shed..and it’s common knowledge that ghosts don’t like bright lights).

We found Rusty still inside in all its glory.

We made a path through the cobwebs and wood debris and  proceeded to unload everything off of the Shopsmith. Without the lead weights, iron castings, and extraneous crap...er...stuff which was stored on the Shopsmith unit, it rolled quite easily.  We (my wife and I with my Mother-in-law standing on the side acting as coach, cheerleader, and part time lawyer should we hurt ourselves and decide to sue) were able to roll the unit out of the shed and onto the trailer without the need of the winch or the local high school football team.

Committed to leave no part behind, we continued to search through the dungeon for other hidden treasures and extraneous parts.  As luck would have it, we stumbled on a bucket of antique Shopsmith parts, including the priceless Jacobs drill chuck.  Wanting to press our luck no further, we packaged up the treasures, lashed everything down onto the trailer, and escaped to the mountains high above San Bernardino.  Even Belloq would not be able to find us here. 


A New Home


Rusty has found his final resting place at Skyforest, CA.


......along with the remaining treasures. 


Rusty's side kicks include a table saw, Jacobs drill chuck, speed changer, original A.O.Smith 3/4 hp motor, 12" disk sander, lathe tool rest, miter gauge, and a Magna 4" Jointer.


Time has taken its toll on Rusty.  There is significant rust everywhere, the main carriage does not slide on the tubes, the quill/drill chuck unit doesn't retract automatically (a broken spring...or just a lot of gunk?), and the motor electrical cord is a disaster waiting to happen.  


So now, the cleaning, scrubbing, soaking, and rebuilding process begins....stay tuned.